Creating Dataset in Opik using Node-RED
This tutorial will walk you through using a pre-built Node-RED flow to automatically generate a question-and-answer dataset in your Opik service. The flow pulls information from a knowledge base, uses an AI to create relevant questions and answers, and then populates a new dataset in Opik.
Prerequisites
Before you begin, ensure you have:
- Created an Opik Service: You should have already followed the previous guide to create an Opik service.
- Service Credentials: Have the URL, Username, and Password for your Opik service ready. You can find these in your service's "Service Settings" page.
- Node-RED Setup: This Node-RED flow should be imported and running. You can download the flow here. (Right-click and "Save link as..." to download)

Understanding the Workflow
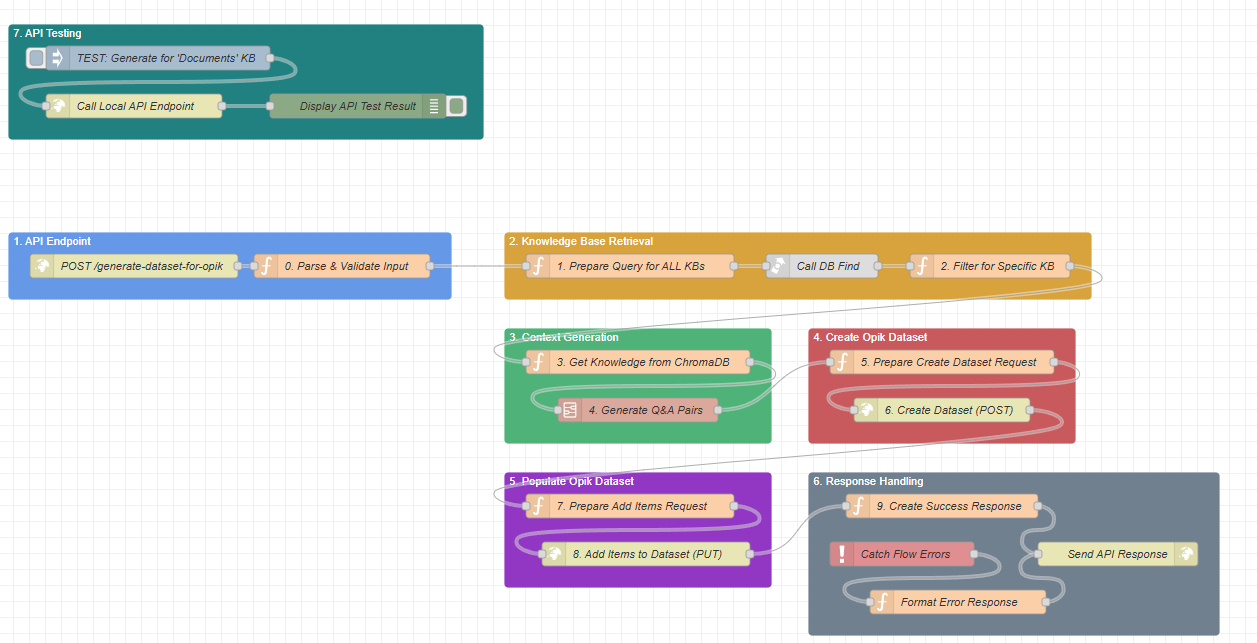
This Node-RED flow is designed as an automated pipeline, divided into logical stages. Each colored block represents a key part of the process:
- API Endpoint (Blue): This is the entry point. It receives the initial request to start the dataset generation process.
- Knowledge Base Retrieval (Orange): It finds the correct knowledge base (e.g., your product documentation) to use as a source of truth.
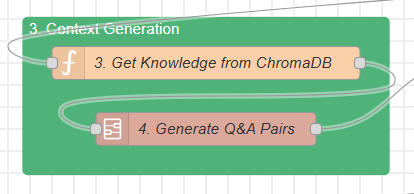
- Context Generation (Green): It pulls the content from the knowledge base and uses an AI model (like GPT) to generate relevant question-and-answer pairs based on that content.
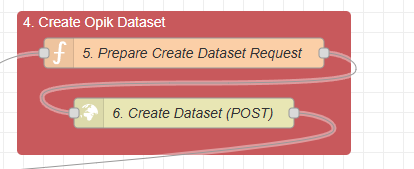
- Create Opik Dataset (Red): It sends a request to your Opik service to create a new, empty dataset.
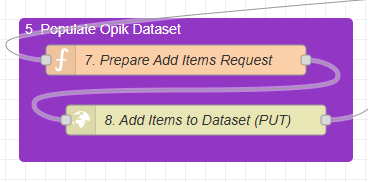
- Populate Opik Dataset (Purple): It takes the Q&A pairs generated by the AI and adds them to the newly created dataset in Opik.
- Response Handling (Grey): It finalizes the process by sending a success message or catching and formatting any errors that occurred.
- API Testing (Dark Green): A manual trigger for developers to test the entire flow from within Node-RED.
Step-by-Step Guide to Creating a Dataset
To generate a dataset, you will interact with the API Endpoint defined in the flow.
Step 1: Trigger the API Endpoint (Method A)
The entire process is initiated by sending a POST request to the Node-RED endpoint. This is what the blue "API Endpoint" block is for. You will need an API client (like Postman, Insomnia, or a simple curl command) to do this.
URL: http://<your-node-red-ip>:1880/generate-dataset-for-opik
Method: POST
Body (JSON): You need to provide two pieces of information:
topic: The name of the knowledge base you want to use as the source.num_questions(optional): The number of Q&A pairs you want to generate. If you don't specify this, it will default to 5.
Example using curl:
curl -X POST http://127.0.0.1:1880/generate-dataset-for-opik \
-H "Content-Type: application/json" \
-d '{
    "topic": "Documents",
    "num_questions": 15
}'

Method B: Manual Trigger via the Inject Node (Testing Use)
For easy testing directly within the Node-RED editor, you can use the pre-built testing mechanism.
Locate the dark green block at the top of the flow labeled "7. API Testing".
Inside this block, you will find an Inject node named "TEST: Generate for 'Documents' KB".
To run the entire flow, simply click the square button on the left side of this node.
Clicking this button immediately sends a pre-configured payload into the flow, simulating the exact same process as calling the API. By default, it is configured to use the "Documents" topic and generate 10 questions. You can double-click this Inject node to change the JSON payload and test different scenarios without needing an external tool.

Step 2: Knowledge Base Retrieval and Context Generation
Once you send the request, the flow automatically executes the next steps:
The orange "Knowledge Base Retrieval" block takes the topic you provided ("Documents") and finds the corresponding knowledge base in its database.
The green "Context Generation" block then extracts the content from that knowledge base. This content is then sent to an AI model along with a carefully crafted prompt, instructing it to generate high-quality question-and-answer pairs.


Step 3: Dataset Creation in Opik
Now, the flow is ready to interact with your Opik service. But first, it needs to know where to send the request.

Configuration Note: Setting Up Your Opik Credentials For this flow to communicate with your specific Opik service, you must configure its details within Node-RED's global environment variables. This is a crucial one-time setup that allows the flow to authenticate correctly. You will need to set:
opik_url: The full base URL of your Opik service.opik_username: The username for your service.opik_password: The password for your service.
The red "Create Opik Dataset" block uses the Opik service URL (that you configured in Node-RED) to send a POST request. This creates a new, empty dataset with a unique name (e.g., documents-qa-dataset-166862_). This step requires your Opik service to be running and accessible.
Step 4: Populating the Dataset
With the dataset created, the final step is to add the content.
The purple "Populate Opik Dataset" block takes the Q&A pairs generated by the AI in Step 2 and sends them to your Opik service using a PUT request. This fills the dataset with the valuable information it generated.

Step 5: Check the Result
The grey "Response Handling" block will send a final response back to your API client. Response not only confirms the success but also includes the actual question-and-answer pairs that were generated and added to the dataset.
If everything was successful, you will receive a 201 Created status and a JSON response like this:
{
    "status": "success",
    "message": "Dataset 'documents-qa-dataset-1753794383467' created and populated successfully.",
    "dataset_name": "documents-qa-dataset-1753794383467",
    "items_added": 10,
    "generated_questions": [
        {
            "source": "MANUAL",
            "data": {
                "input": "How do I create a Kubernetes cluster?",
                "expected_output": "To create a Kubernetes cluster, follow the instructions outlined in the Kubernetes creation documentation provided on the cloud compute engine documentation site."
            }
        },
        {
            "source": "MANUAL",
            "data": {
                "input": "How do I manage volumes in the cloud compute engine?",
                "expected_output": "You can manage volumes using the volume management documentation, which details tasks such as creating, attaching, and resizing volumes."
            }
        }
    ]
}
If something went wrong (e.g., the knowledge base wasn't found or the Opik service was down), it will return a detailed error message.
You can now log in to your Opik service using the credentials from the setup guide, navigate to the Datasets section, and you will see your new, fully populated dataset ready for evaluation and use