Connect to LLM
In this section, we will:
- Create a basic flow to process user input.
- Connect Node-RED to a Large Language Model (LLM) API such as OpenAI.
- Enhance the AI Agent with memory to maintain conversation context.
Prerequisites
Before proceeding, ensure you have:
- Node-RED services created in your UBOS workspace.
- An API key for OpenAI.
Creating a Basic Flow to Process User Input with LLM
We will begin by setting up a simple flow in Node-RED that receives user input and passes it to an AI model.
- Open Node-RED and go to the flow editor.
- Drag and drop the following nodes:
- Inject Node: To simulate user input.
- Function Node: To format input for API.
- HTTP Request Node: To call the LLM API.
- Debug Node: To display responses.
JSON of the flow
[
    {
        "id": "88ff5c82a08207f1",
        "type": "inject",
        "z": "465c30b32ffb6826",
        "name": "User Request",
        "props": [
            {
                "p": "payload"
            },
            {
                "p": "topic",
                "vt": "str"
            }
        ],
        "repeat": "",
        "crontab": "",
        "once": false,
        "onceDelay": 0.1,
        "topic": "",
        "payload": "{\"input\":\"Hi, how are you?\"}",
        "payloadType": "json",
        "x": 150,
        "y": 160,
        "wires": [
            [
                "function-openai-request"
            ]
        ]
    },
    {
        "id": "function-openai-request",
        "type": "function",
        "z": "465c30b32ffb6826",
        "name": "Prepare OpenAI Request",
        "func": "const apiKey = \"YOUR-OPEN-AI-TOKEN\";\n\nmsg.headers = {\n    \"Authorization\": `Bearer ${apiKey}`,\n    \"Content-Type\": \"application/json\"\n};\nmsg.input = msg.payload.input;\n\nmsg.payload = {\n    model: \"gpt-4\",\n    messages: [\n        { \"role\": \"system\", \"content\": \"You are a helpful assistant.\" },\n        { \"role\": \"user\", \"content\": msg.input }\n    ],\n    temperature: 0.7,\n    max_tokens: 150\n};\n\nmsg.url = \"https://api.openai.com/v1/chat/completions\";\nreturn msg;",
        "outputs": 1,
        "timeout": "",
        "noerr": 0,
        "initialize": "",
        "finalize": "",
        "libs": [],
        "x": 370,
        "y": 160,
        "wires": [
            [
                "http-request-openai"
            ]
        ]
    },
    {
        "id": "http-request-openai",
        "type": "http request",
        "z": "465c30b32ffb6826",
        "name": "Call OpenAI API",
        "method": "POST",
        "ret": "obj",
        "paytoqs": "ignore",
        "url": "",
        "tls": "",
        "persist": false,
        "proxy": "",
        "insecureHTTPParser": false,
        "authType": "",
        "senderr": false,
        "headers": [],
        "x": 620,
        "y": 160,
        "wires": [
            [
                "cf5a6b135527a885"
            ]
        ]
    },
    {
        "id": "cf5a6b135527a885",
        "type": "debug",
        "z": "465c30b32ffb6826",
        "name": "Open AI Response",
        "active": true,
        "tosidebar": true,
        "console": false,
        "tostatus": false,
        "complete": "true",
        "targetType": "full",
        "statusVal": "",
        "statusType": "auto",
        "x": 850,
        "y": 160,
        "wires": []
    }
]
Prepare OpenAI Request - Function Node Code Description
This Function Node prepares a request for an OpenAI-powered AI assistant within Node-RED. The goal is to take user input, format it according to OpenAI's API requirements, and send a request to retrieve an AI-generated response.
const apiKey = "sk-proj-o...";

msg.headers = {
    "Authorization": `Bearer ${apiKey}`,
    "Content-Type": "application/json"
};
msg.input = msg.payload.input;

msg.payload = {
    model: "gpt-4",
    messages: [
        { "role": "system", "content": "You are a helpful assistant." },
        { "role": "user", "content": msg.input }
    ],
    temperature: 0.7,
    max_tokens: 150
};

msg.url = "https://api.openai.com/v1/chat/completions";
return msg;
1. API Authentication
The code sets up authentication using an API key, which is required to interact with OpenAI's models. The Bearer Token Authorization method is used to ensure secure communication.
2. Request Headers
The headers include:
- Authorization: The API key is included to authenticate the request.
- Content-Type: Specified as
"application/json", indicating the request body is formatted in JSON.
3. User Input Handling
The code extracts user input from msg.payload.input and assigns it to msg.input. This ensures that the input is properly formatted before sending it to the API.
4. Constructing the API Request Payload
The payload consists of:
- model: Specifies which OpenAI model to use (e.g.,
"gpt-4"). - messages: A structured conversation containing:
- System message: Defines the assistant’s behavior (e.g.,
"You are a helpful assistant."). - User message: The actual input received from the user.
- System message: Defines the assistant’s behavior (e.g.,
- temperature: Controls the response's creativity (higher values make responses more random, lower values make them more predictable).
- max_tokens: Limits the response length to prevent excessive token usage.
5. Defining the API Endpoint
The request is sent to https://api.openai.com/v1/chat/completions, which is OpenAI’s chat-based completion endpoint.
6. Returning the Message Object
Finally, the modified msg object, containing all necessary parameters, is passed to the next node in the Node-RED flow. The HTTP Request Node will then send this request to OpenAI and receive a response.
Running the Node-RED Flow: Input and Output
In this section, we will demonstrate the execution of our Node-RED flow. The input will be sent using an Inject Node, and the response from OpenAI will be displayed in the Debug Window.
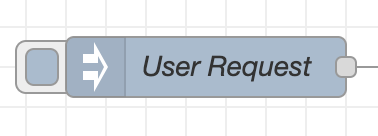
To execute the AI agent in Node-RED, click on the Inject Node. This action will send the predefined input to the function node, process it through OpenAI’s API, and display the response in the Debug Window.
1. Input Sent to the Flow
The following JSON request was injected into the flow by Inject Node:
{
    "input": "Hi, how are you?"
}
Output in Node-RED Debug Window
JSON of the LLM Output
{
    "_msgid": "6a671e7b6f58c9e2",
    "payload": {
        "id": "chatcmpl-AzkOVqbqiN9yKtw7KgE4UsJ6e39RW",
        "object": "chat.completion",
        "created": 1739279711,
        "model": "gpt-4-0613",
        "choices": [
            {
                "index": 0,
                "message": {
                    "role": "assistant",
                    "content": "Hello! I'm an artificial intelligence and don't have feelings, but I'm here and ready to assist you. How can I help you today?",
                    "refusal": null
                },
                "logprobs": null,
                "finish_reason": "stop"
            }
        ],
        "usage": {
            "prompt_tokens": 23,
            "completion_tokens": 31,
            "total_tokens": 54,
            "prompt_tokens_details": {
                "cached_tokens": 0,
                "audio_tokens": 0
            },
            "completion_tokens_details": {
                "reasoning_tokens": 0,
                "audio_tokens": 0,
                "accepted_prediction_tokens": 0,
                "rejected_prediction_tokens": 0
            }
        },
        "service_tier": "default",
        "system_fingerprint": null
    },
    "input": "Hi, how are you?",
    "url": "https://api.openai.com/v1/chat/completions",
    "statusCode": 200
}
After processing the request, the OpenAI API returned a structured JSON response containing important details:
✅ Key Response Data:
Model Used:
gpt-4-0613
The response was generated using thegpt-4-0613model, a version of OpenAI's GPT-4 optimized for efficiency and accuracy.Completion ID:
A unique identifier (chatcmpl-AzkOVqbqiN9yKtw7KgE4UsJ6e39RW) was assigned to this chat completion request for tracking and debugging.Response Status Code:
200
Indicates that the API call was successful.Total Tokens Used:
54- Prompt Tokens:
23(Tokens used for the input question:"Hi, how are you?") - Completion Tokens:
31(Tokens used in the AI's response) - Total Tokens:
54(Prompt + Completion)
- Prompt Tokens:
AI Response:
The assistant responded with:"Hello! I'm an artificial intelligence and don't have feelings, but I'm here and ready to assist you. How can I help you today?"Finish Reason:
"stop"
This means the AI completed its response naturally without needing to be cut off due to token limits.
Extending the Flow: Adding Memory to the AI Agent
To make our AI agent more intelligent, we need to allow it to remember past interactions. This will enable context-aware responses, where the AI can refer to previous messages to maintain conversation continuity.
Why Add Memory?
- Without memory: Each request is independent, and the AI does not recall past messages.
- With memory: The AI keeps track of previous messages and uses them to generate responses that consider context.
Modifying the Flow to Support Memory
We will update our Function Node to:
- Store chat history using Node-RED’s
global.set()function. - Retrieve past interactions and append new messages before sending them to OpenAI.
- Limit memory size to prevent excessive token usage.
Updated Function Node Code (with Memory Support)
const apiKey = "sk-proj-o...";

msg.headers = {
    "Authorization": `Bearer ${apiKey}`,
    "Content-Type": "application/json"
};
msg.input = msg.payload.input;

// Retrieve conversation history (or create an empty array if none exists)
let history = global.get("chat_history") || [];

// Add the latest user input
history.push({ role: "user", content: msg.payload.input });

// Limit the history size to avoid excessive token usage (e.g., keep last 5 messages)
if (history.length > 5) history.shift();

// Construct the payload with memory
msg.payload = {
    model: "gpt-4",
    messages: [
        { "role": "system", "content": "You are a helpful assistant." },
       ...history // Include stored conversation history
    ],
    temperature: 0.7,
    max_tokens: 150
};

// Store the updated history in Node-RED’s global memory
global.set("chat_history", history);

msg.url = "https://api.openai.com/v1/chat/completions";
return msg;
Now that our AI agent remembers past user inputs, we also need it to remember its own responses. This will allow it to maintain a coherent conversation over multiple exchanges.
To achieve this, we will add a new Function Node after the OpenAI response node. This node will:
- Extract the AI's response from the API output.
- Store both the user input and AI response in Node-RED’s global memory.
- Limit stored messages to avoid excessive memory usage.
Updating the Flow: Saving AI Responses
New Function Node: "Save AI Response to Memory"
- Drag a new Function Node into the flow after the OpenAI Response (Debug Node).
- Connect the HTTP Response Node (
Call OpenAI API) to this new Function Node. - Use the following code to store the conversation history:
// Retrieve existing chat history (or create an empty array if none exists)
let history = global.get("chat_history") || [];

// Extract the AI response from OpenAI’s API output
let aiResponse = msg.payload.choices[0].message.content;

// Add AI's response to the conversation history
history.push({ role: "assistant", content: aiResponse });

// Limit the history size (keep the last 5 messages)
if (history.length > 5) history.shift();

// Save updated history to global context
global.set("chat_history", history);

return msg;
Final Node-RED Flow: AI Agent with Memory
Now that we have successfully implemented memory storage for both user inputs and AI responses, the final Node-RED flow should look like this:

Final Flow JSON
[
    {
        "id": "88ff5c82a08207f1",
        "type": "inject",
        "z": "465c30b32ffb6826",
        "name": "User Request",
        "props": [
            {
                "p": "payload"
            },
            {
                "p": "topic",
                "vt": "str"
            }
        ],
        "repeat": "",
        "crontab": "",
        "once": false,
        "onceDelay": 0.1,
        "topic": "",
        "payload": "{\"input\":\"Hi, how are you?\"}",
        "payloadType": "json",
        "x": 150,
        "y": 160,
        "wires": [
            [
                "function-openai-request"
            ]
        ]
    },
    {
        "id": "function-openai-request",
        "type": "function",
        "z": "465c30b32ffb6826",
        "name": "Prepare OpenAI Request",
        "func": "const apiKey = \"sk-proj-o...\";\n\nmsg.headers = {\n    \"Authorization\": `Bearer ${apiKey}`,\n    \"Content-Type\": \"application/json\"\n};\nmsg.input = msg.payload.input;\n\n// Retrieve conversation history (or create an empty array if none exists)\nlet history = global.get(\"chat_history\") || [];\n\n// Add the latest user input\nhistory.push({ role: \"user\", content: msg.payload.input });\n\n// Limit the history size to avoid excessive token usage (e.g., keep last 5 messages)\nif (history.length > 5) history.shift();\n\n// Construct the payload with memory\nmsg.payload = {\n    model: \"gpt-4\",\n    messages: [\n        { \"role\": \"system\", \"content\": \"You are a helpful assistant.\" },\n       ...history // Include stored conversation history\n    ],\n    temperature: 0.7,\n    max_tokens: 150\n};\n\n// Store the updated history in Node-RED’s global memory\nglobal.set(\"chat_history\", history);\n\nmsg.url = \"https://api.openai.com/v1/chat/completions\";\nreturn msg;",
        "outputs": 1,
        "timeout": "",
        "noerr": 0,
        "initialize": "",
        "finalize": "",
        "libs": [],
        "x": 370,
        "y": 160,
        "wires": [
            [
                "http-request-openai"
            ]
        ]
    },
    {
        "id": "http-request-openai",
        "type": "http request",
        "z": "465c30b32ffb6826",
        "name": "Call OpenAI API",
        "method": "POST",
        "ret": "obj",
        "paytoqs": "ignore",
        "url": "",
        "tls": "",
        "persist": false,
        "proxy": "",
        "insecureHTTPParser": false,
        "authType": "",
        "senderr": false,
        "headers": [],
        "x": 600,
        "y": 160,
        "wires": [
            [
                "3e516106c7caa523"
            ]
        ]
    },
    {
        "id": "cf5a6b135527a885",
        "type": "debug",
        "z": "465c30b32ffb6826",
        "name": "Open AI Response",
        "active": true,
        "tosidebar": true,
        "console": false,
        "tostatus": false,
        "complete": "true",
        "targetType": "full",
        "statusVal": "",
        "statusType": "auto",
        "x": 1090,
        "y": 160,
        "wires": []
    },
    {
        "id": "3e516106c7caa523",
        "type": "function",
        "z": "465c30b32ffb6826",
        "name": "Save LLM response to memory",
        "func": "// Retrieve existing chat history (or create an empty array if none exists)\nlet history = global.get(\"chat_history\") || [];\n\n// Extract the AI response from OpenAI’s API output\nlet aiResponse = msg.payload.choices[0].message.content;\n\n// Add AI's response to the conversation history\nhistory.push({ role: \"assistant\", content: aiResponse });\n\n// Limit the history size (keep the last 5 messages)\nif (history.length > 5) history.shift();\n\n// Save updated history to global context\nglobal.set(\"chat_history\", history);\n\nreturn msg;",
        "outputs": 1,
        "timeout": 0,
        "noerr": 0,
        "initialize": "",
        "finalize": "",
        "libs": [],
        "x": 850,
        "y": 160,
        "wires": [
            [
                "cf5a6b135527a885"
            ]
        ]
    }
]
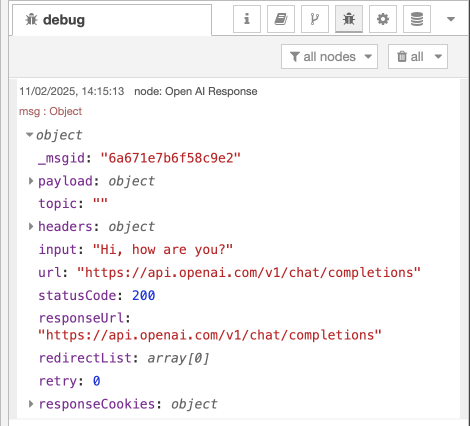
Exploring Global Context in Node-RED
One of the most useful debugging features in Node-RED is the Context Explorer. This tool allows us to visualize and inspect stored variables, making it easier to understand the current state of our AI Agent.
Viewing AI Memory in Node-RED Context Explorer
The image below shows the Context Explorer window in Node-RED, where we can see our stored global variables:
Global Context Stores Conversation History
- The
chat_historyarray contains past interactions. - First entry (
0): User input ("Hi, how are you?"). - Second entry (
1): AI response ("Hello! As an artificial intelligence, I don't have feelings, but I'm here and ready to assist you.").
- The
Real-Time Debugging Capability
- The Context Explorer provides an easy way to inspect stored variables.
- Developers can use this tool to validate memory updates and ensure that AI interactions are stored correctly.
Why is this important?
✅ Debugging Made Easy: Quickly check if conversation history is correctly stored.
✅ Ensuring AI Continuity: Verify that past messages persist across different user interactions.
✅ Advanced Customization: Modify or clear stored values directly from the Node-RED UI.
🚀 This feature will be incredibly useful as we continue to enhance our AI Agent with more complex memory handling and external API integrations!