Agent-to-Agent (A2A) Connection Guide
This guide provides a step-by-step walkthrough for connecting your Agentspace agent as an agent using the SSE (Server-Sent Events) protocol.
Overview
The Agent-to-Agent protocol enables standardized communication between AI agents through:
- Agent Discovery: Retrieve agent metadata and capabilities
- SSE Streaming: Real-time bidirectional communication
- Context Management: Maintain conversation history across messages
Prerequisites
Before you begin, ensure you have:
- ✅ Your agent deployed and accessible on Agentspace
- ✅ A tool to make HTTP requests (curl, Postman, or a programming language HTTP client)
- ✅ Ability to handle Server-Sent Events (SSE) streams
A2A Inspector Tool
For testing and validating your A2A connections, we recommend using the A2A Inspector - an open-source tool that helps you:
- Validate agent cards and their structure
- Test SSE streaming connections
- Debug agent conversations in real-time
- Visualize message flow and responses
GitHub Repository: https://github.com/a2aproject/a2a-inspector
The A2A Inspector provides a user-friendly interface to discover agents, send messages, and view streaming responses with proper formatting. All UI screenshots of agent card and conversation in this guide are taken from the A2A Inspector.
Step 1: Get the Agent Card URL
The agent card is a JSON document that describes your agent's capabilities, supported protocols, and available endpoints. It follows the standardized .well-known/agent.json convention.
Agent Card URL Structure
https://{host-domain}/discovery/{agent-id}/.well-known/agent.json
How to Obtain
- Navigate to your Agentspace My Agents
- Click the link below your deployed agent to open agent details page in new tab
- Copy the agent card URL from the API Documentation tab
- The URL will be in the format shown above
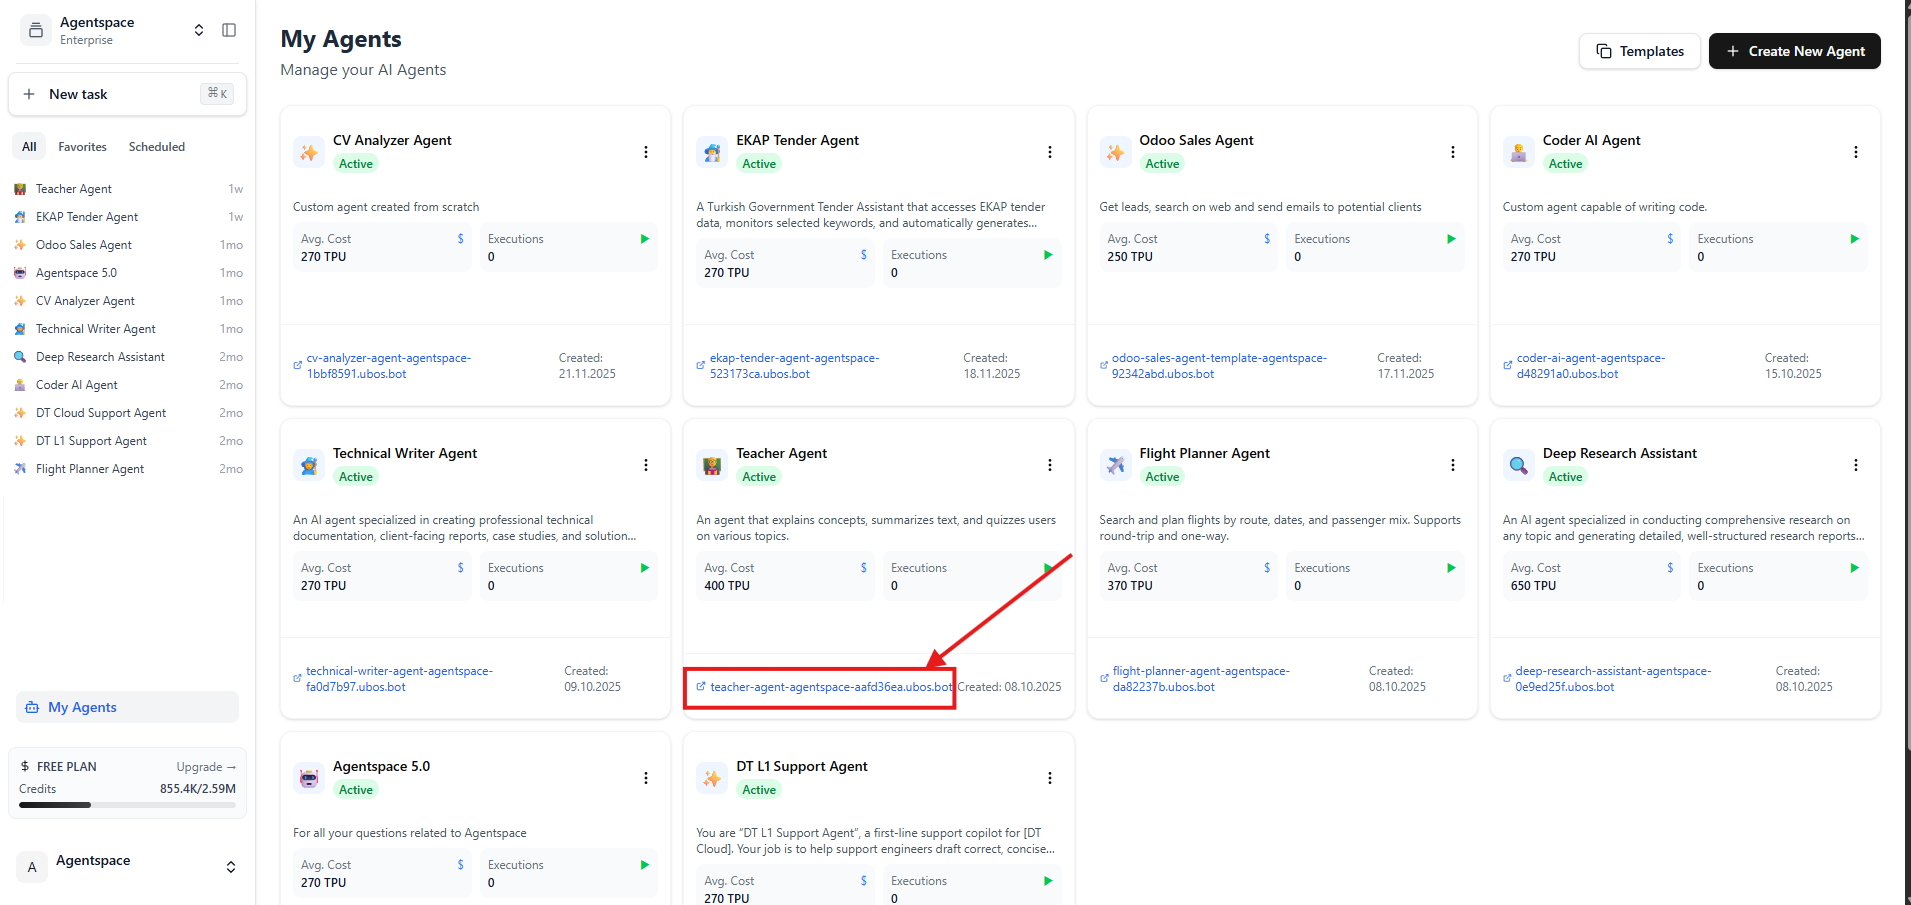 Figure 1: Click the link below your agent to open the agent details page in new tab
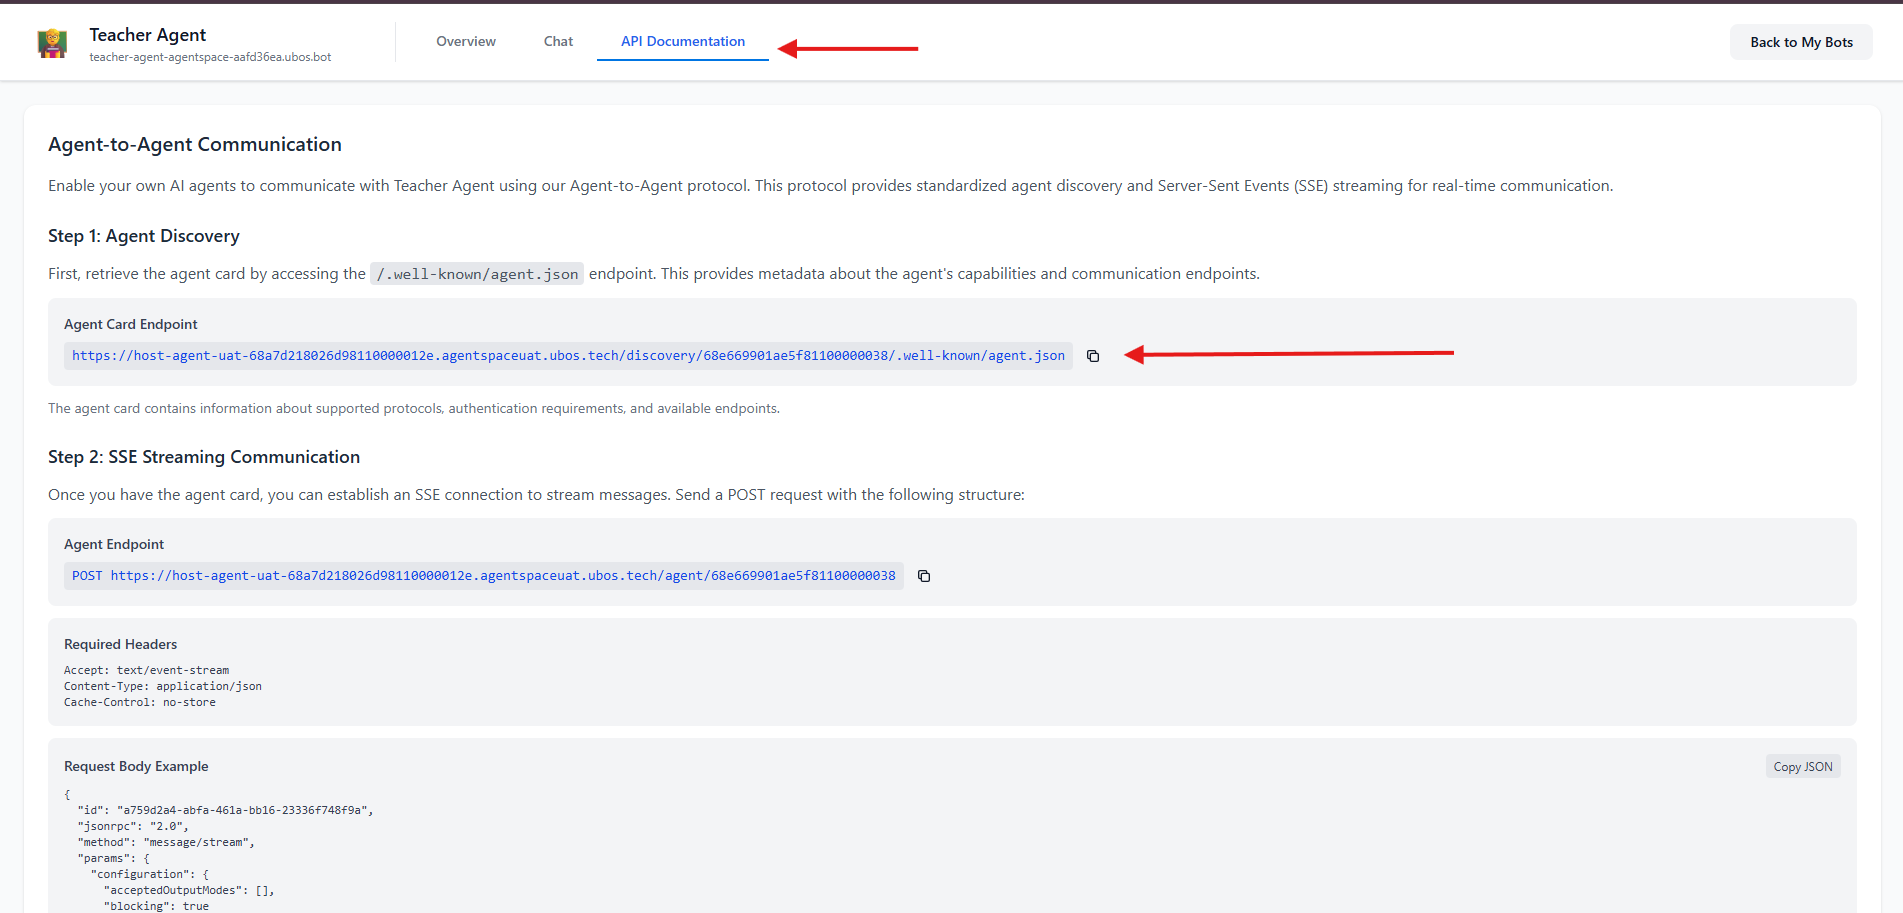 Figure 2: Click API Documentation on the new tab to access Agent Card Endpoint
Step 2: Discover Agent Card and Add Agent
Now that you have the agent card URL, retrieve the agent metadata to understand its capabilities and communication endpoints.
Make a GET Request
Use any HTTP client to fetch the agent card:
Using curl
curl -X GET "{your-agent-card-url}" \
  -H "Accept: application/json"
Using JavaScript/Node.js
const agentCardUrl = "{your-agent-card-url}";

fetch(agentCardUrl)
  .then(response => response.json())
  .then(agentCard => console.log(agentCard))
  .catch(error => console.error('Error:', error));
Understanding the Agent Card Response
The agent card contains crucial information:
{
  "name": "Teacher Agent",
  "description": "An agent that explains concepts, summarizes text, and quizzes users on various topics.",
  "version": "1.0.0",
  "url": "https://{host-domain}/agent/{agent-id}",
  "protocolVersion": "0.3.0",
  "capabilities": {
    "streaming": true,
    "pushNotifications": false
  },
  "defaultInputModes": ["text"],
  "defaultOutputModes": ["text"],
  "skills": [
    {
    "description": "Use this tool when you want to understand any topic, from simple to complex.",
    "examples": [
        "Explain quantum cosmputing like I'm 12."
    ],
    "name": "Explain_Concept",
    }
  ]
  {...}
}
Key Fields:
name: The agent's display nameurl: The endpoint for sending messages (use this in Step 3)description: Used by host agent to choose when to call this agentversion: Agent version
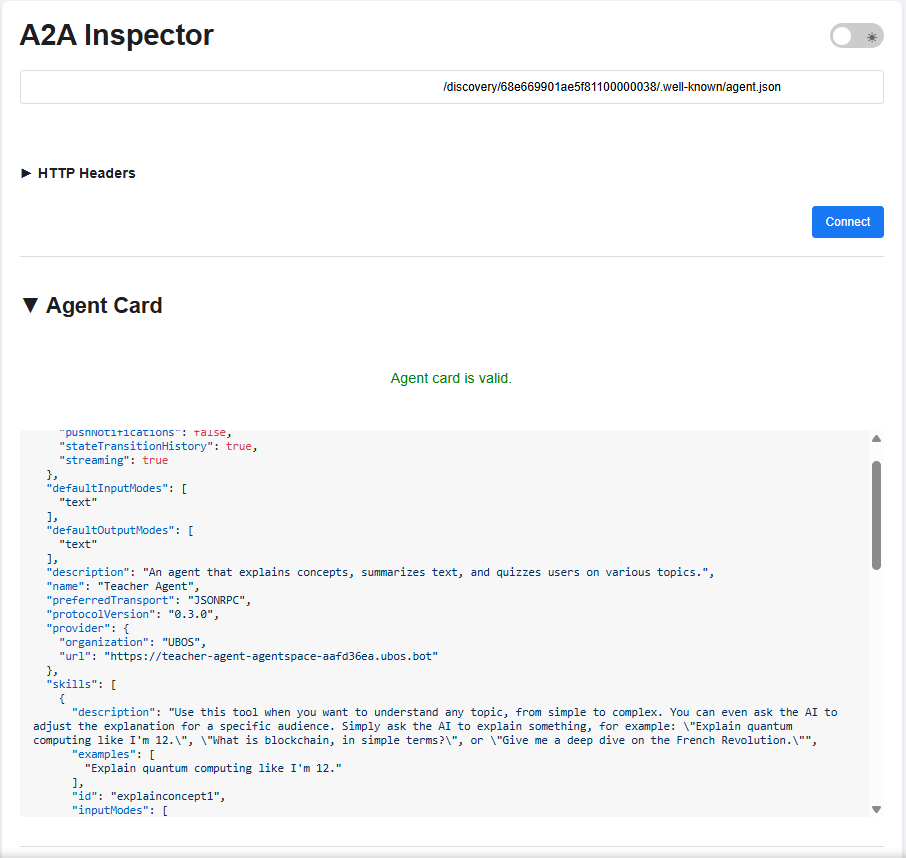 Figure 3: Sample Agent Card JSON Response using A2A inspector
Step 3: Send Messages via SSE Streaming
With the agent endpoint from the agent card (the url field), you can now establish an SSE connection and send messages.
Agent Message Endpoint
Use the url from your agent card response:
POST {agent-url-from-card}
Required Headers
Accept: text/event-stream
Content-Type: application/json
Cache-Control: no-store
Request Body Structure
{
  "id": "{unique-request-id}",
  "jsonrpc": "2.0",
  "method": "message/stream",
  "params": {
    "configuration": {
      "acceptedOutputModes": [],
      "blocking": true
    },
    "message": {
      "contextId": "{conversation-context-id}",
      "kind": "message",
      "messageId": "{unique-message-id}",
      "parts": [
        {
          "kind": "text",
          "text": "Your message here"
        }
      ],
      "role": "user"
    }
  }
}
Field Descriptions
| Field | Description | Required | Notes |
|---|---|---|---|
id | Unique request identifier | ✅ Yes | Generate a new UUID for each request |
jsonrpc | JSON-RPC version | ✅ Yes | Always "2.0" |
method | RPC method name | ✅ Yes | Use "message/stream" for SSE |
params.configuration.blocking | Wait for complete response | ✅ Yes | true for synchronous, false for async |
params.message.contextId | Conversation context ID | ✅ Yes | Keep the same ID to maintain conversation history |
params.message.messageId | Unique message identifier | ✅ Yes | Generate a new UUID for each message |
params.message.parts | Message content array | ✅ Yes | Can contain text, images, or other content types |
params.message.role | Message sender role | ✅ Yes | Typically "user" or "assistant" |
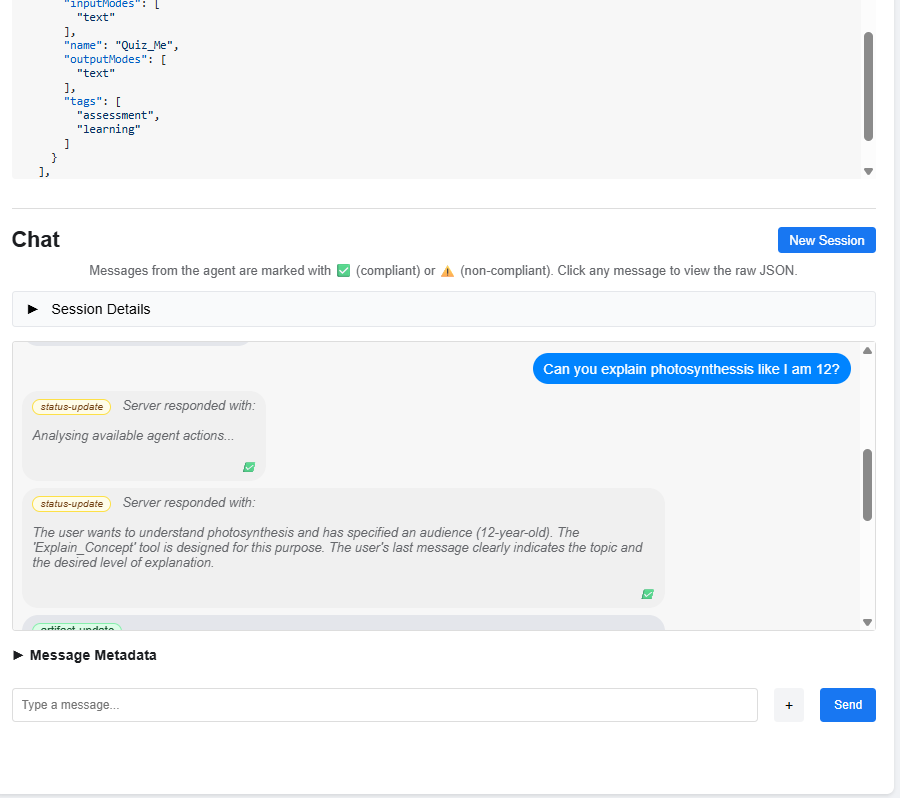
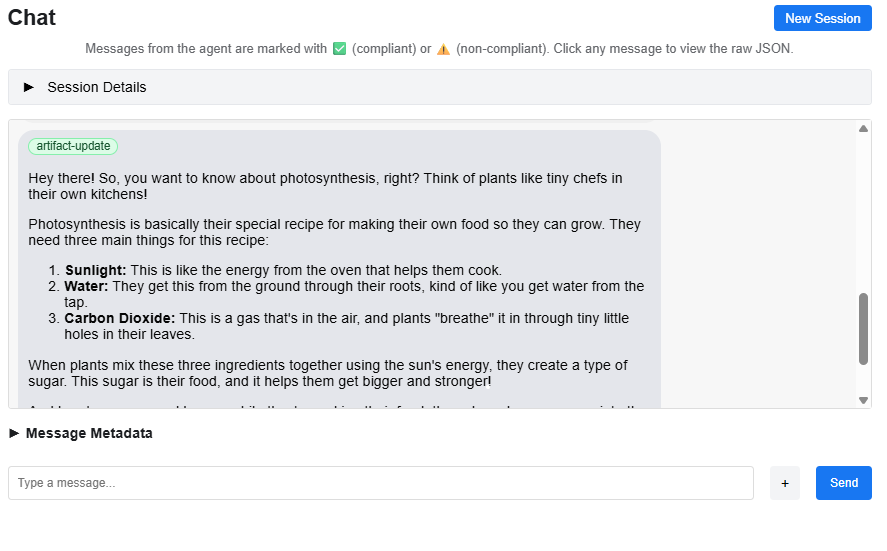 Figure 4-5: Conversation with status-updates and artifacts using A2A Inspector
Complete Code Examples
JavaScript/Node.js Example
const fetch = require('node-fetch');
const { v4: uuidv4 } = require('uuid');

// Agent endpoint from agent card (the 'url' field)
const agentEndpoint = "{agent-url-from-card}";

// Generate unique IDs
const requestId = uuidv4();
const contextId = uuidv4();  // Keep this for conversation continuity
const messageId = uuidv4();

// Prepare request
const payload = {
  id: requestId,
  jsonrpc: "2.0",
  method: "message/stream",
  params: {
    configuration: {
      acceptedOutputModes: [],
      blocking: true
    },
    message: {
      contextId: contextId,
      kind: "message",
      messageId: messageId,
      parts: [
        {
          kind: "text",
          text: "What is the capital of France?"
        }
      ],
      role: "user"
    }
  }
};

// Send request and handle SSE stream
fetch(agentEndpoint, {
  method: 'POST',
  headers: {
    'Accept': 'text/event-stream',
    'Content-Type': 'application/json',
    'Cache-Control': 'no-store'
  },
  body: JSON.stringify(payload)
})
.then(response => {
  const reader = response.body;

  reader.on('data', (chunk) => {
    const text = chunk.toString();
    console.log('Received:', text);

    // Parse SSE format
    const lines = text.split('\n');
    lines.forEach(line => {
      if (line.startsWith('data: ')) {
        const data = line.substring(6);
        try {
          const parsed = JSON.parse(data);
          console.log('Parsed event:', parsed);
        } catch (e) {
          console.log('Raw data:', data);
        }
      }
    });
  });

  reader.on('end', () => {
    console.log('Stream ended');
  });
})
.catch(error => console.error('Error:', error));
Understanding SSE Responses
Server-Sent Events (SSE) stream responses in a specific format. Here's what to expect:
SSE Event Format
SSE responses are sent as a series of events. Each event follows this format:
event: message
data: {JSON object}

event: message
data: {JSON object}
Common Response Types
1. Status Update
Status updates inform you about the agent's current state and what it's working on:
{
  "kind": "status-update",
  "contextId": "{context-id}",
  "taskId": "{task-id}",
  "final": false,
  "status": {
    "state": "working",
    "timestamp": "{timestamp}",
    "message": {
      "kind": "message",
      "messageId": "{msg-id}",
      "role": "agent",
      "parts": [
        {
          "kind": "text",
          "text": "The user wants to understand photosynthesis and has specified an audience, ..."
        }
      ]
    }
  }
}
Key Fields:
kind: Always"status-update"for status messagesstatus.state: Current state (e.g.,"working","complete")status.message: Agent's internal reasoning or progress updatefinal: Whether this is the final status update
2. Artifact Update
Artifact updates contain the actual response content from the agent:
{
  "kind": "artifact-update",
  "contextId": "{context-id}",
  "taskId": "{task-id}",
  "artifact": {
    "artifactId": "{artifact-id}",
    "name": "agent_response",
    "parts": [
      {
        "kind": "text",
        "text": "Hey there! So, you want to know about photosynthesis, right? ..."
      }
    ]
  }
}
Key Fields:
kind: Always"artifact-update"for content responsesartifact.parts: Array of content parts (text, images, etc.)artifact.name: Identifier for the artifact typeartifactId: Unique identifier for this artifact
Response Type Summary
| Response Type | kind Value | Purpose | Contains |
|---|---|---|---|
| Status Update | status-update | Progress and reasoning | Agent's internal state and thinking |
| Artifact Update | artifact-update | Content response | The actual answer or output |
Processing SSE Streams
When processing SSE streams, handle both response types:
reader.on('data', (chunk) => {
  const text = chunk.toString();
  const lines = text.split('\n');

  lines.forEach(line => {
    if (line.startsWith('data: ')) {
      const data = line.substring(6);
      try {
        const parsed = JSON.parse(data);

        if (parsed.kind === 'status-update') {
          // Handle status updates
          console.log('Status:', parsed.status.state);
          if (parsed.status.message) {
            console.log('Agent thinking:', parsed.status.message.parts[0].text);
          }
        } else if (parsed.kind === 'artifact-update') {
          // Handle artifact updates (actual response)
          const content = parsed.artifact.parts[0].text;
          console.log('Response:', content);
        }
      } catch (e) {
        // Ignore parse errors
      }
    }
  });
});
Handling Multi-Turn Conversations
To maintain conversation context, use the same contextId across multiple messages:
// First message
const contextId = uuidv4();
sendMessage(contextId, "What is the capital of France?");

// Follow-up message (same contextId)
sendMessage(contextId, "What about its population?");
The agent will remember previous messages in the conversation when you reuse the contextId.
Important Notes and Best Practices
🔑 UUID Generation
- Always generate unique UUIDs for:
id(request ID) - New for every requestmessageId(message ID) - New for every messagecontextId(conversation context) - Same for related messages
const { v4: uuidv4 } = require('uuid');

const requestId = uuidv4();      // New each request
const messageId = uuidv4();      // New each message
const contextId = uuidv4();      // Persistent per conversation
🔄 Context Management
- Keep the same
contextIdto maintain conversation history - Create a new
contextIdto start a fresh conversation - The agent uses
contextIdto track related messages
Next Steps
Now that you've successfully connected to an agent using A2A protocol:
- Explore Advanced Features: Check the agent card for additional capabilities
- Build Multi-Agent Systems: Connect multiple agents together
- Monitor Performance: Track response times and error rates
- Scale Your Integration: Implement connection pooling and rate limiting
Additional Resources
- A2A Inspector - Testing and validation tool
- Agent2Agent (A2A) Protocol
- SSE (Server-Sent Events) Reference
Support
If you encounter issues or have questions:
- Use the A2A Inspector to test and debug your connections
- Review the agent card for specific requirements
Last Updated: January 2, 2026
Version: 1.0