Tool Manager
Tool Manager is a convenient tool for managing services on the platform, allowing administrators to easily add and configure new services. It includes the following key features:

Adding Categories
Tool Manager allows administrators to create categories for organizing services. The modal window includes the following elements:
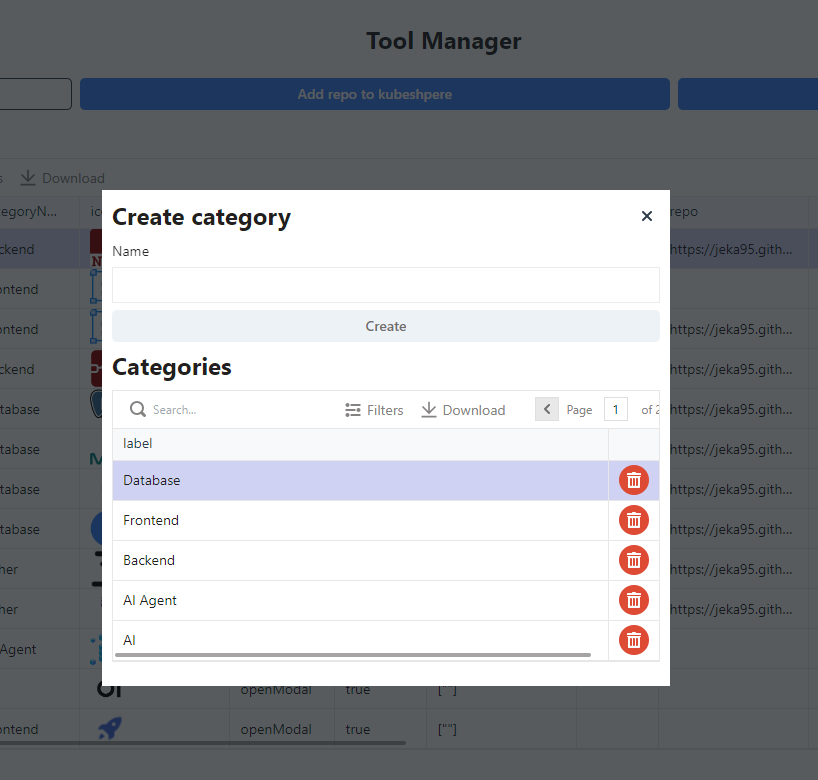
- "Name" field: Allows you to enter the name of a new category.
- "Create" button: After entering the name, clicking this button will create a new category.
- Category list: Shows existing categories such as "Frontend", "Backend", "Database", etc.
- Delete icon: Each category has a trash icon, which allows the category to be deleted.
Adding Helm Charts
Tool Manager allows administrators to add Helm charts separately from service creation. This is done through the modal window with the following elements:
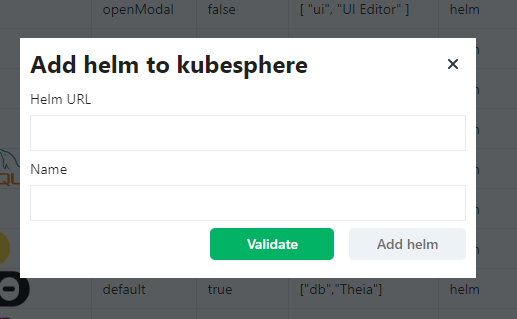
- "Helm URL" field: Enter the URL where the Helm chart is located. This allows the chart to be downloaded from the specified repository or hosting.
- "Name" field: Enter the name of the Helm chart, which will be displayed in the list of services after being added.
- "Validate" button: Checks if the entered Helm URL is valid and accessible.
- "Add helm" button: After validation, clicking this button will add the Helm chart to the platform.
This process ensures that Helm charts can be uploaded and added for further use when configuring services.
Creating a New Service
Administrators can create new services through the Tool Manager by selecting a category, icon, visibility settings, and using Helm charts for automation. All information about the service, including its configuration and repositories, is saved for quick access and management.
Basic Service Information
In the first step, the administrator must fill in the basic data to create a new service.
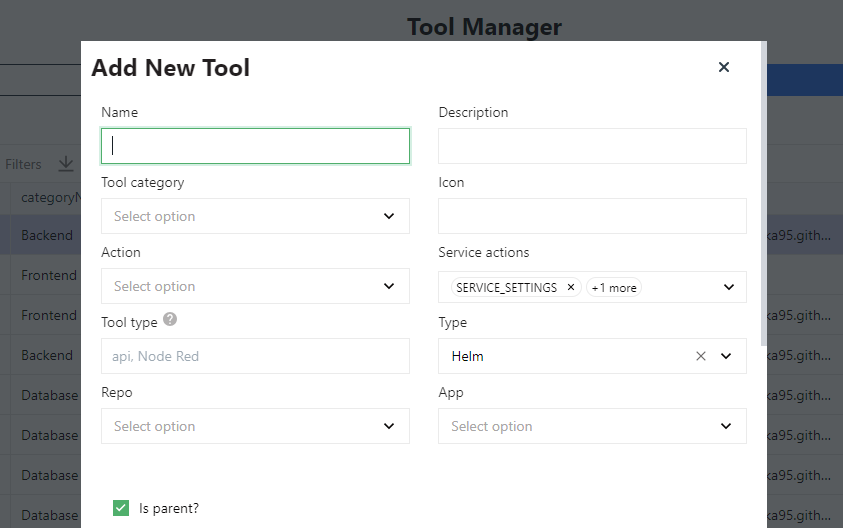
Name: Field for entering the name of the new service.
Description: Field for providing a short description of the service that explains its purpose.
Tool Category: Select the category to which the new service will belong (e.g., Frontend, Backend, Database, etc.).
Icon: Field for selecting or uploading an icon that will be associated with the service.
Action: Select the action that will be performed during the operation of the service. The following options are available:
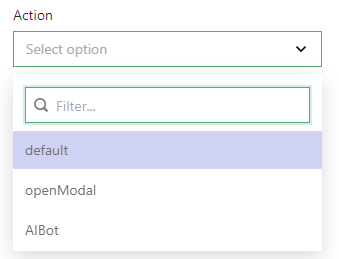
- default: The service will be available to all users by default.
- openModal: A modal window will open, allowing users to submit a request.
- AIBot: The service will activate an AI bot for specific interactions.
Service Actions: This multi-select option allows administrators to choose the available actions for the service. Each selected action defines what operations can be performed with the service, such as managing settings, deleting the service, or opening specific modals for further interaction.
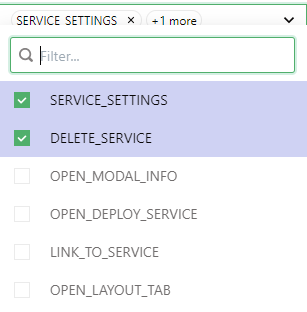
The following service actions can be selected:
- SERVICE_SETTINGS: Configure the settings for the service.
- DELETE_SERVICE: Remove the service from the platform.
- OPEN_MODAL_INFO: Open a modal window with information about the service.
- OPEN_DEPLOY_SERVICE: Open deployed service in a new browser tab.
- LINK_TO_SERVICE: Provide a direct link to the service.
- OPEN_LAYOUT_TAB: Open a layout tab in UBOS platform related to the service.
Tool Type: Field for specifying the type of tool, such as API, Node Red.
Type: Select the type of Helm chart that will be used for deploying the service.
Repo: This is a selector for choosing from all previously added Helm repositories, from which the Helm chart for the service will be used.
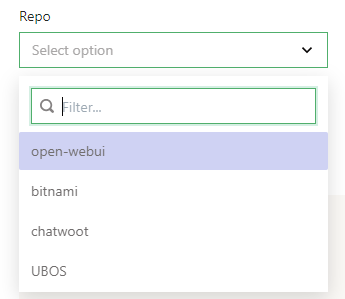
App: This is a selector for choosing the Helm charts available in the selected repository. Once the repository is chosen, this field displays the charts found in that repository for deployment.

- Is Parent?: (Under development)
form.json Field
The form.json field defines the structure of the form that users will interact with when setting up the service. It allows for custom fields and specific settings to be configured. Below are examples of how this field is structured and used:


This field is responsible for generating the user form when setting up the service. A key field here is the "url" field, which can either be:
"url": "service-url": This indicates that the service will only have an internal link."url": "ingress-url": This means the service will have an external link accessible from outside the network.
The type of URL chosen determines whether the service will be internally or externally accessible.
To properly fill out form.json, it is important to follow certain rules:
- If you want to pass a password that will be automatically generated, the value should be
"g-password". - If you want the system to generate 4 random digits, the value should be
"g4".
Following these guidelines ensures that the form.json is correctly formatted and behaves as expected during service setup.
values.yaml Field
The values.yaml file is used for specifying the values with which the Helm chart will be launched. This YAML file contains pod configurations, metadata, and other important parameters.
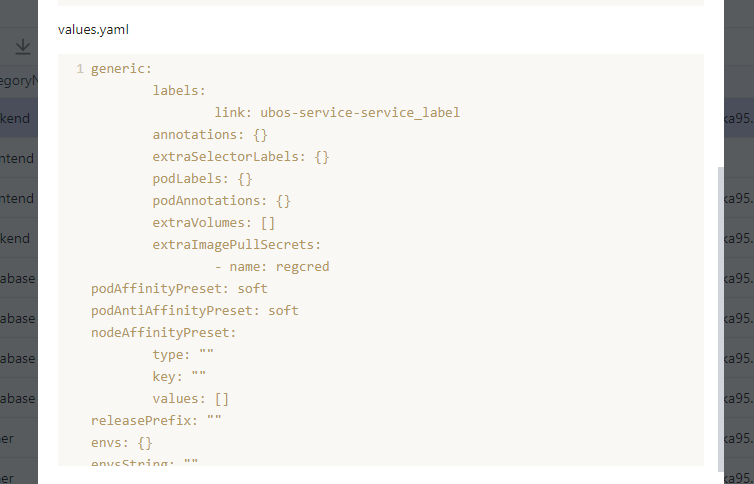
To use data from form.json, it needs to be passed in values.yaml according to specific rules. For example, if you want to use the "name" field from form.json, you should pass it in values.yaml as "ubos-service-name".
Here’s an example of how to correctly pass these values:
imagePullPolicy: Always
env:
  - name: MONGO_INITDB_DATABASE
    value: ubos-service-name
envsFromSecret: {}
Following these rules ensures proper integration between the form.json values and the values.yaml file for launching Helm charts.
datasource.json Field

The datasource.json file contains additional fields that are stored in the database when the service is set up. Currently, the only available field is:
- "path": This field is responsible for appending a suffix to the service’s final URL.
For example, if the service has a base URL, the value in the "path" field will be appended to it, defining the complete endpoint for the service.
Init Container Field(Under development)

Other Settings
Additional options that configure the behavior of the service.
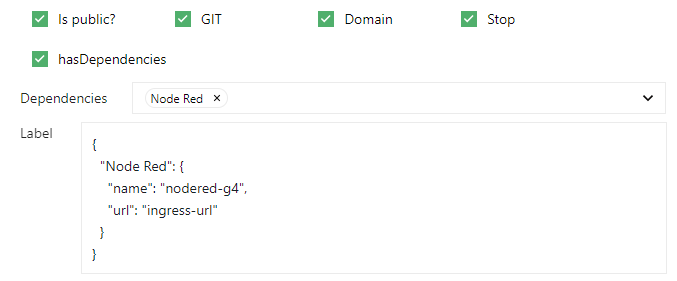
The following options are available:
- isPublic: Determines whether the service is accessible for public use.
- GIT: Indicates whether the service has the option to connect to a GIT repository.
- Domain: Specifies whether the service can have a custom domain added to it.
- Stop: Enables the ability to pause or stop the service after it has been deployed.
- hasDependencies: Enabling the launch of services that this service depends on
Has Dependencies Mode
This feature allows you to select dependencies for the service, such as reliance on another tool or service (e.g., Node Red).

It consists of a multi-select dropdown where you can choose the services this service depends on. In the second field, the form.json of these selected services is displayed, showing relevant configuration details.
To use values from the form.json of these dependent services in the current values.yaml, certain rules must be followed.
Specifically, if you want to pass the "name" value from the dependent service, it should be passed as "service.name".
Here’s an example:
env:
  - name: nodeRedName
    value: "Node Red.name"
  - name: nodeRedUrl
    value: "Node Red.url"
In this example:
"Node Red.name"refers to the name value from the Node Red service's form.json."Node Red.url"refers to the url value from the same service.
Additional Informatio
Working with Nested Helm Charts
Helm charts can vary significantly in complexity. Some Helm charts are simple and self-contained, while others may have nested or embedded sub-charts within them. These nested charts allow for more modular, reusable, and configurable setups.
For example, the Chatwoot Helm chart includes various sub-charts for services like databases or additional dependencies that the main service relies on. When dealing with such charts, it's important to know how to properly configure these sub-charts.
Example: Modifying the Chatwoot Helm Chart
The Chatwoot Helm chart includes sub-charts for components like PostgreSQL and Redis. Below is an example of how to modify the values.yaml file to:
- Add a nodeSelector to run the pods on specific nodes.
- Set tolerations for taints on the nodes.
- Adjust the replicaCount to define how many instances of a pod should run.
Here’s an example configuration:
chatwoot:
  replicaCount: 3   # Set 3 replicas for Chatwoot service

postgresql:
  primary:
    nodeSelector:      # Assign PostgreSQL to specific nodes
      kubernetes.io/hostname: node-1
    tolerations:       # Allow PostgreSQL to run on nodes with taints
      - key: "node-role.kubernetes.io/postgresql"
        operator: "Exists"
        effect: "NoSchedule"
    resources:         # Resource requests and limits for PostgreSQL
      requests:
        memory: "1Gi"
        cpu: "500m"
      limits:
        memory: "2Gi"
        cpu: "1"

redis:
  master:
    nodeSelector:      # Assign Redis to specific nodes
      kubernetes.io/hostname: node-2
    tolerations:       # Allow Redis to run on nodes with taints
      - key: "node-role.kubernetes.io/redis"
        operator: "Exists"
        effect: "NoSchedule"
    replicaCount: 2    # Set 2 replicas for Redis service
    resources:
      requests:
        memory: "1Gi"
        cpu: "500m"
      limits:
        memory: "2Gi"
        cpu: "1"
Key Considerations
- nodeSelector: This ensures that the particular services (like PostgreSQL and Redis) run on designated nodes in your cluster.
- tolerations: This setting allows your services to run on nodes that are tainted, preventing other pods from running unless they have the appropriate toleration.
- replicaCount: This controls how many instances of a particular service (like Chatwoot, PostgreSQL, or Redis) will be deployed, ensuring redundancy and scalability.
By modifying the values.yaml file in such a way, you can control the behavior of both the primary and nested Helm charts within a single deployment. This flexibility allows for more tailored configurations based on your infrastructure and requirements.
Understanding how to work with nested Helm charts is crucial for managing complex services like Chatwoot, ensuring that each component is deployed according to your specific needs.